Sunday 28 November 2010

Victorian Christmas by Alison Hall

For my third and final piece as November's Guest Designer, I decided to make a Christmas card.

The Artistic Stamper has some wonderful vintage Christmas stamps, and there are plenty to choose from.

For the main image, I chose the little girl hanging her Christmas stocking up, from Victorian Christmas 1. I coloured the image with Antique Linen Distress Ink, edged it with Fired Brick, and matted it onto black card.


The corner stamps are from Victorian Christmas 2. This layer was also coloured with Antique Linen, then matted onto green card. I added some torn, inked music sheet, then the little girl image.
The Baubles were stamped onto clear shrink plastic, and coloured with Sakura Stardust pens. I punched a hole at the top, before shrinking them. These were attached to a length of vintage brass chain, then attached to the stamped layers with Tim Holtz long fasteners.


I covered an 8 x 8 inch square card with music sheet, then attached the stamped layer to this.

The 'poinsettia' is made from Grungepaper, diecut with the Tattered Florals and Tattered Leaves Alterations dies. They were coloured with Distress Inks, then I added Rock Candy Distress Stickles to the petals, and Fired Brick to the leaves. The centre of the poinsettia is a shrink plastic bauble, that had the top cut off before it was shrunk.


I hope you like my vintage Christmas card, and thank you for looking.
Alison

Saturday 27 November 2010

Bling & Baubles By Hels Sheridan

Oooh, I loooove Christmas, all the preparations, the decorations and the fact that I can add as much bling to artwork and get away with it LOL For this piece I have used the brand new Steampunk Bauble stamps - aren't they just F A B!!!


I started with some Gold Nuggest TSS metal - you can any colour you want to to match in with your festive colour theme, which was popped onto black card with Humungo Tape. I stamped the baubles with Black StaZon, giving it a quick zap with a heat gun to set the ink. Next I used a teflon tipped refining tool (TSS) and added little indents all around the cogs inside the baubles and then used a scootchy tool to make a nice edge for each one. These were then covered with Black Dabber, which was wiped off with paper towel whilst still wet - this just ages the metal nicely and the paint sits in the bits you have refined.


The base of the canvas was covered with Terra, which was stamped into using background stamps, heat dried to make it warty and then painted with Traditional Tan, A Dash of Red and Sable Brown Claudine Hellmuth paints. Once these were all dried, I used some Perfect Pearl mists - Heirloom Gold and Forever Red, spritzing and heating to dry them. These added a load of bling which doesn't really show in the pics. Finally, I used my favourite applicator tool (my index finger LOL) and popped some Inka Gold onto the bobbles on the canvas to highlight the contours. I added Idea-ology Ball Chain for the baubles to hang from and a Memo Pin and Charm Clip for the sentiment. Thanks for looking! TTFN

Hels x

Thursday 25 November 2010

3 birds in a row!-by Jennie

Hi, it's the boss again, but don't worry I won't be staying long..lol Just popped in to show you a hanging piece I made , which doesn't take long, and is just perfect for your Christmas Tree, or for any occasion really! I used 3 different sized Chipboard birds from Maya Road, These came from the Fancy Bird coaster, mini bird cages, and the bird keyring.
I coloured them using my favourite colour..blue! I took three different shades of Distress ink, and used the direct to paper, or in this case direct to chipboard. I loved how it came up different shades.
 
The stamp is one of Wendy Vecchi's swirls from here Botanical Art stamps, which if stamped randomly gives a great pattern. I inked them with Pearl Dabbber. Just make sure you use a rub it scrub it to clean the stamp before the paint dries!
The birds are joined together with Tim's Lace chain, and a few of his baubles to add a bit of bling! The pearly colouring in between the birds on the chain, is a new product which will be available on the website shortly , and is called Hot Tubez. Watch this space :))


If you would like to be in with a chance of winning this hanging birdie set, then just leave a comment on this post, add it to your sidebar for another chance and I will pick the winner next week on Friday 3rd December.
Have a very Creative day
Hugs
Jennie

Tuesday 23 November 2010

Happy Birthday by Tina Barnett

Hello!

This adorable little Mabel Lucie Attwell stamp is available at The Artistic Stamper


This is such a beautiful stamp and lends itself to so many themes, Birthday, Friends, Children's cards, etc


I have coloured the stamp with Promarkers. I have kept a purple/blue colour theme throughout as I thought it looked good with just a limited colour theme. Of course you can go mad with colours if you wish!


I punched a little boarder and added a ribbon and bow, along with a little sentiment. I then added some paper flowers with little glittered centers.


I then finished off with a few gems.


A simple card but stylish! I mean what else do you need to add with such a fabulous stamp!


That's me for now! See you soon.


Hugs Tina xx


Sunday 21 November 2010

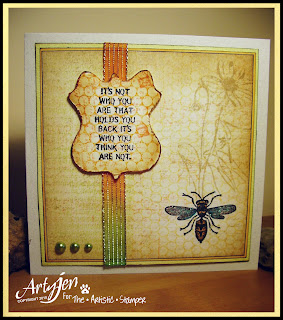
Bee Botanical by Sioux Jenneys

Hello everyone! It's my (Sioux) turn again and I'm here to share a card :)


1. First I stamped the bee from Oddities Plate in Versafine onyx black onto cream textured rive paper...this texture helps to add to the old print look......stamp the bee again on scrap paper...cut out and use this as your mask.
...please don't bother to cut round the fiddly legs it's not necessary ;) and don't worry it's the only mask you will be using!


2. Randomly stamp the script from Mini Ornates in Distress Ink Old Paper as a second stamping then fill in the gaps with the Music #11 Plate in Adirondack salmon (second stamping)
...it might look a bit untidy at the minute but you won't see the join shortly! LOL


3. Stamp the Sequin Waste Open background in Adirondack lemonade on the side where the bee is.
...remember your mask should still be on there.

4. Stamp the Houndstooth background in Adirondack willow on the opposite side.

5. Stamp the Daisy in Distress Ink Old Paper and distress the edges with this colour too.

6. Remove the mask and colour the bee with Distress Ink Wild Honey and Adirondack Stream using Cut and Dry Nibs.....add Diamond Stickles to the wings.
...I think the close up here will help to see the layers of stamping


7. Cut a shield from the Regal Crest die....so love that!...and stamp the sequin waste open in Distress Ink Wild Honey as a second stamping.......over stamp with the small postcard image from the Purely Random plate in Adirondack salmon and add the T!m sentiment in Versafine.......

8. Matt the botanical background onto card distressed with Wild Honey and then another distressed with Willow.
...edge all three layers with a black marker before assembly!

9. Fix a piece of ribbon and stick all three layers to the base card then pop the shield on using 3d foam or silicone and add some Prima Pearls  oh so gorgeous!


Ooh! Making that made me happy :) See you again soon!
xoxo Artyjen

Wednesday 17 November 2010

Lace Card - by Sioux Jenneys

Hi Sioux here!

The world is spinning faster each day and all of a sudden it's my turn again!!!

Today I'm sharing a card :)


1. Take a creased cream coloured long tall card (74 x 210mm) and using the T!m Styled Label Die cut a decorative top in it.

2. Stamp the Lacy Border in 3 different inks onto card....I used Distress Ink Scattered Straw Archival Crimson and Adirondack Latte....for no other reason than liking the colour combo ;)
3. Cut out all three and colour the edges a little with Distress Ink Tattered Rose and at the same time edge the card with this too dragging some over the entire surface.....stick the lace borders to the card using double sided tape.

4. Cut a shield shape from the T!m Regal Crest Die and stamp with the Baroque Background using Adirondack Pool

.....I wanted a very light colour here so this is actually a third stamping of the image!
5. Stamp the T!m sentiment from the Purely Random Plate in Versafine Onyx Black

....I particularly like this ink for detailed image and sentiment stamps ;)

6. Colour the edges with a little more Pool and Tattered Rose....edge with a gold pen and add some gorgeous Prima Pearls.

7. I was going to use some of the printed twill that has music on for the final embellishment but at the moment it is out of stock (it will be back soon no doubt) so I used some of the plain twill and stamped the Music Plate onto it instead.....love it!

...there is a way round most things I find ;) ! LOL


I hope you liked the card :)

See you soon!
xoxo Artyjen

Sunday 14 November 2010

Free as a Bird by Alison Hall

I don't know about you, but I love using corrugated card in my artwork! It provides great texture, & best of all, it's free! (Well, mine is, as I pinch the kit kat boxes from the newsagents where I work! Lol!)


For my birdy hanger, I used the lovely 'Free as a Bird' and 'Birds of a Feather' stamp sets, and also the Bare Tree, which is such a useful little stamp.

Here's how I made my piece

1. Take a piece of corrugated card (approx. 9" x 7"), and rip off most of the covering to reveal plenty of texture. Paint this with copper paint dabber, then, when it's dry, highlight the raised area with hazlenut and terracotta paint dabbers. Distress the edges with a Tim Holtz distress tool.

2. Now take a piece of white card (approx. 7" x 5"), and colour it with crushed olive, wild honey, rusty hinge, and forest moss distress inks. Use the same inks to stamp a background with the Bare Tree and Distressed Background. Dry this with a heat gun, then stamp the tree twice, and the flock of birds (from Birds of a Feather) with versamark ink, and emboss the images with vintage photo distress embossing powder. Use the distress tool on the edges, then ink them with forest moss DI.


3. Stamp the bird box and wren from Birds of a Feather, and the birdcage and phrase from Free as a Bird, onto book pages with black ink. I used pages from a book on birds to keep up the theme, but any will do. Tear around the phrase, and ink the edges with black. Cut out the other images.


4. Assemble the backgrounds and images as shown, then add copper coloured eyelets to the top, and thread with copper bead chain.

Hope you like my little piece of art, and thanks for looking!

Saturday 13 November 2010

An Old Favourite... By Hels Sheridan

Goodly morning! I am happy, happy, happy today because I have been playing with ink and card and getting thoroughly messy in the process. I have made a card - which was based on a tag - which as I'm sure I may have told you (like a gadzillion times) that I loooove tags.


Well, I decided to make a tag that was flat on top and didn't have a hole... which in effect means it is ... a card LOL So... starting out with a Non Stick Craft Sheet, I dabbed and squidged the following colours of Distress Inks onto it: Antique Linen, Barn Door, Fired Brick, Vintage Photo and Brushed Corduroy, making sure that the colours don't overlap each other. Next I used a Mini Mister with water in it to spritz over the DI's to make a "wash". The next stage is to take you piece of card and press it onto the inkyness, dry with a heat gun and then repeat the process until you are happy with the look. I have found over the years of doing this technique that if I dry a little bit of the inkyness up with the heatgun it goes into more concentrated droplets, which then transfer to the cardstock... giving it a dappled look, which I like :O))


Next, I edged the card with Brushed Corduroy - I do this so it "closes" the card in, so the inkyness on the card is the focal point - hope that makes sense :O)) I used my fave Tim Holtz Collection stamps to add images onto the background.. and then added the Brolly Man, which was stamped in Black Soot and embossed with Black Soot Distress Powder on Grungeboard. His brolly had a dollop of Glossy Accents popped onto the top of it so it looks like rainwater and the sunrise in front of him is where he is headed :O)) *ah, you ol' romantic Hels :O))* I then added a sentiment and an Idea-ology Key to finish. I hope you found the hints here helpful... thanks for looking... have a FAB weekend! TTFN

Hels x

Thursday 11 November 2010

Regal Air Mail - by Sioux Jenneys

Hello everyone! I'm here again (Sioux) and I've got a tag to share with you all :)


1. Firstly stipple colour the background with Adirondack Latte and Salmon

2. I wanted to use images from the Air Mail Bird Collage Elements Plate so firstly stamped the gorgeous bird head in  Archival Jet Black and masked it.

3. Stamped the T!m distressed wings from the Mini Ornates Plate in Distress Ink Old Paper then masked this.

4. Stamped the franked postage stamp from the Air Mail Bird Collage Elements Plate in Distress Ink Worn Lipstick and masked this.....sorry for all the masking but sometimes you just have to do it! :)

5. Stamped the background using Music # 11 Plate in Distress Ink Pumice Stone

6. Removed all the masks and added the words air mail in Adirondack Pool

7. Thought the gorgeous bird looked so regal that he needed a crown LOL! So used the
T!m crown from the Mini Ornates Plate stamped onto some Ten Seconds Studio Metal (Bronzed God) and attached with silicone.

8. Tattered the edges and added some scratch marks with a pricking tool then inked up with Distress Ink Pumice Stone and Bundled Sage
9. Added a bit of printed twill and an Ideaology Philosophy Tag that had a bit of Adirondack Paint Dabber Espresso swiped over it.....oh! and just had to add a touch of enamel accents in black to the eye of the gorgeous bird....did I mention that he's gorgeous before? LOL!


I enjoyed making that :) See you soon!
xoxo Artyjen

Wednesday 10 November 2010

I dreaming of ...............................

............... more Stitchel stamps!

Hi Peeps!

I am going to bug the wonderful Hels Sheridan, the designer of Stitchels, until she caves in and designs more Christmas stamps! I love love love the snowmen and snowladies. They are available at The Artistic Stamper

This cutie is Millie!


I have used my favourite Promarkers to colour the stamp. I decided to go for pinks instead of the traditional colourways, well Millie is a lady!


What I have tried to show in this card is that when you are creating a Christmas Card, you can use embellishments that aren't necessarily Christmas embellishments. Yes I have used a Christmas charm but everything else can be used on any card.


By changing the colour of the flowers to match the colours I have used on the stamp and adding matching ribbon and liquid pearls around the edge bring everything together.
When you look at the card you think "Pink Christmas", but really the stamp and and charm are the only Christmas themed items.
So, come on give it a go, change your everyday embellishments to blend in with your Christmas cards.
I would LOVE to see what you do, so please leave me a comment and I can come and see.
Bye for now!
Tina xxxxxxxxxxx

Monday 8 November 2010

Do you believe? by Jennie

Every month, we have a challenge set by one of the Team, and this month the subject is "Something Hidden " set by Tina. I had lots of ideas for it, but came up with this idea while prepping a workshop for Christmas cards. The wooden angels are great blank canvases, and I used Terra which I smooched all over it and stamped into with a wet stamp. I used the music background, and then immediately washed the stamp clean. If you don't your stamp will harden and be ruined!


Then when it was dry, I sprayed lots of Ranger Perfect Pearl Mists over it. I love the little wire halo in the top! The card was a folded piece which I had from a set and the angel hid quite nicely in it. I covered the card in old music paper from our Vintage papers sets. I was very lucky as the song was "Believe"! Do you believe in Angels? Finally I distress inked it and added a Idea-ology Seasonal sticker and some dabbers too! A gorgeous piece of Idea-ology trimming also sprayed with Mists just finished it off.

If you feel like making something hidden then please join in our challenge and be in with a chance to win £15.00 worth of stamps.
Happy Creating!
Jennie

Thursday 4 November 2010

Daisy Label Card - by Sioux Jenneys

Hello everyone! Sioux here.....it's my turn again and I'd like to share a card with you :)


1. I lurve the watercolour style of the Daisy stamp and inked it up with Distress Inks Scattered Straw/Spiced Marmalade/Shabby Shutters and Peeled Paint then stamped it onto a piece of watercolour paper and tattered the edges inking with Distress Ink Tea Dye.
2. Place the stamped image (it is ATC size by the way) on a square of paper that is just a little smaller than the card front you are using and lightly mark in pencil where the top and bottom corners sit.
3. I desperately wanted a plain shape stamp to put behind the sweet daisy image to ground it but I did not have one then I remembered I had one of T!m's Styled Label dies so cut the shape out of funky foam added a bit of non permanent sticky stuff to the back and inked it up!

(I find using white foam is best as you can see how much ink you have put on it!)


4. Stamp the label in Adirondack Lemonade just to the side of centre.

I do believe this is my new favourite yellow ;)

5. Stamp the Stampers Anonymous T!m Alphabet Block from the Artful Artifacts plate over the label shape using Adirondack Lemonade again.

6. Stamp the Stampers Anonymous T!m Flourish from the Fabulous Flourishes plate over the label shape in the bottom corner using Adirondack Lemonade again.

7. Tatter the edges and use Distress Ink Pumice Stone to add contrast.

8. Add a sentiment of your choice in Distress Ink Rusty Hinge.

9. Attach the background square to your card front and attach the focal image to this.


Job done!

Thanks for looking........See you soon!
xoxo Artyjen

Wednesday 3 November 2010

Layering it on.. October Challenge -Winner!

Thank you to everyone who joined n the challenge in October... it was great fun, and some beautiful entries. Loved all of them! I did use random.org to get a winner, and this person wins £15.00 worth of The Artistic Stamper stamps, plus enough Kling-On to mount them!.. so is it you? Well, if

 would like to step up to get her prize......Congratulations! A beautiful piece. Don't forget to grab your winner blinkie ( down on the right hand side of the blog), and to email me to find out how to claim your stamps.
This month's challenge is set by Tina, and is "something hidden", so get out your stamps, and get creating!
We look forward to seeing your creations.
Happy Stamping!
Jennie

Tuesday 2 November 2010

Life is a Journey! By Alison Hall

That's certainly true! Hi! Alison here! Thank you Jennie & Hels for giving me my first ever guest designer opportunity! And what fabulous stamps I've had to play with! For my first piece, I chose to use Jennie's wonderful new Inspiration Light Bulbs. I thought they'd make great hot air balloons. And, to carry on the steampunk theme, I used the Cogs Background, and also the Calligraphic mat and the Punk Plaid Background.


Here are the instructions for my frame

1. Paint a Shadowbox with Gesso, then spread Ferro all around the frame of it. Stamp into the wet Ferro with the Cogs Background & the Caligraphic Mat. Make sure you wet your stamps when you do this, and clean them thoroughly straight afterwards.

2. While the box is drying, make the metal inlay. This is a piece of Ten Seconds Studio silver sheet metal, embossed with the TSS Kabuka Mould 7. Age it with Pitch Black Dabber, use Ultramarine Stazon to colour it, then add highlights with Orange Inka Gold.

3. Back to the Shadowbox. Once it is dry, sponge Azure Precious Metal Paint all over it, including the cavity. Add highlights to the stamped areas with Silver PM Paint and Orange Inka Gold. Once the paint is dry,adhere the metal inlay into the cavity, using red line tape.


4. To make the 'balloons' and sentiment embellishments, make a 'tape sandwich' with silver metal, humungo tape & black card. Stamp two of the Blank Lightbulbs, the Punk Plaid Background, & the phrase 'All of Life is a Journey' onto the metal, with Black Stazon.

5. Cut out the two Lightbulbs, then stamp one with the Cogs Background, & the other with the Caligraphic Mat. Use a TSS embossing tool to highlight the detail, then the TSS Micro Diagonal wheel around the edges.


6. Cut two basket shapes from the Punk Plaid Background, then emboss them with the TSS tools. Attach the baskets to the 'balloons' with short lengths of silver wire.

7. Cut out the phrase and emboss the edges of this with the TSS wheel tool. Rub a little of the Orange Inka Gold onto all of the metal embellishments, then curve them all slightly before gluing them to the frame with silicone glue.

8. To finish the frame, add a few pieces of Tim Holtz Ideaology.

I hope you like this piece - and thank you for looking!

Alison

Monday 1 November 2010

November Monthly Challenge - Something Hidden

Morning Stampers and a pinch n a punch to you all :O)) Today is the first of the month, so that can mean only one thing... time for a brand new monthly challenge theme. Thank you to everyone who joined in with last months challenge... the winner of the candy will be announced by Jennie on Wednesday - drawn randomly by Mr. Random.org :O)) On with the theme for this months challenge... chosen by Tina, our Colouring Artist Extraordaire, the theme is SOMETHING HIDDEN. To join in, all you need to do is make a piece of art, be it a card, ATC, tag, altered art - that is entirely up to you... include the theme and some rubberstamping. If you use Artistic Stamper stamps, your name will be entered into the draw twice... the prize is £15 worth of Artistic Stamper stamps of your choice, plus the KlingOn to mount them onto. Leave us a comment here and add your link (to be added shortly by the blog technician cos I am toooo thick to know how to do it ROFL) when you have entered ...oh and you can enter more than once... please just remember to use rubber stamping on your design.


So, for my entry I have used a little papier mache book - any kind of papier mache item will work with this technique though. I painted a layer of watered down Traditional Tan paint and dried it quickly with a heat gun. Then I added some Cloudy Blue Dabber - again watered down slightly and applied with a paint brush... and dried again - finally a stipple brush of Sable Brown paint... dragged over the surface to make it patchy... and then a dab of Copper Dabber... again dried immediately. I have found to my cost - leaving the painted surface to dry naturally warps and buckles the papier mache... and normal thickness paint bubbles too much under the heat - hence the watered down versions :O)) I made a little card insert for the inside... colouring with DI's and stamping with Tim Holtz collection stamps.


I made some Grungepaper roses using the large and medium flowers from the Flower Power sets, painted the Grungepaper with Copper Dabber and then assembled the large rose on the front of the book with a couple of Grungepaper Leaves, cut from the Tattered Leaves Alterations Die, embossed with a Texture Fade and then coloured with Crushed Olive and Brushed Corduroy Distress Inks. I added some Idea-ology Baubles, Memo Pins & Book Plate for decoration and made a little mouse using Fimo - he has Idea-ology Ball & Chain for his tail... I think he is quite cute and mouses like being in a nice cosy cubby hole... so that's why he is hiding in the book :O)) Anyways... that is my entry... what are you going to make?? The idea's are endless; secret compartments, little flipflaps to open up to read a message, words hidden in sketches... go on, have some inky fun! Thanks for looking... TTFN

Hels x